Monday, April 29, 2013

Setting the Stage


I got the scoop  from Suzanne on the phone call we got from our upholstery people.
The call was to let us know that they would be dropping off the cockpit interior as
opposed to them holding it to the end and installing it. What we have in mind as 
we work to completion is that we are starting in the cabin and working our way out. 
So the cockpit interior will not be trampled on as we work on other things I'll be
storing all of it in a separate area to keep it nice and fresh till we are ready to
install it. 
All safely tucked away and ready for install
New Logos look great


 The next few days will be interesting as we pull together all the final elements
for the project. This mornings e-mail had some correspondence from Bill
at Great Lakes Teak , we received our CAD drawings for the decking, I'm very
happy about this. In the beginning when Suzanne was selling me the "Yachtsville"
program the teak flooring seemed real cool I but don't wear shoes much in the
boat and carpet was sounding better. After seeing Bill's work and the overall look 
of the product with the cockpit interior, I'm sold.
This is the CAD sheet that the computer will follow to cut the material, at the last 
minute we added the front foot rests and cabin stairs, we think it completes the job.

Last  but not least my long time friend Dennis Berry removed those very sad
Bravo 3 lower units  for reconditioning. Dennis and I agree that in a perfect world 
we would replace the cases, if not the complete drives. Well,  I don't live any
where near perfect, so sandblasting and epoxy paint will have to do.
Dennis will be servicing the gimbals housings, welding some bad spots ,
resealing the cases,  replacing the internal shift cables, new anodes and
all the ground cables. During Dennis and my last conversation 
we were talking about all the elements of the repairs and somehow I was put in
charge of "making those drives pretty". Hey wait , I've heard that before. The last guy
who said that to me ended up being a pirate. Maybe Dennis has a little captain in him.
No matter what I sure wont be sweating the work quality, Captain Dennis has that
part nailed down. ARRGH !!

Getting the drive job started completes the list , the stage is set .

Up Next :  Double Burger -- done to perfection


Tuesday, April 16, 2013

Little Boxes of Happiness


We selected  Great Lakes Teak of Chicago to provide and install the
new decking. Suzanne and I really enjoyed our visit with them as they patterned
our new flooring. These guys were a hoot, lots of joking around and lighthearted
fun, but well experienced professionals at work always make it look fun and easy.
We are excited to see the end results.


 This is a photo of Bill and his partner as they made the patterns.
I'm sure Bill is thrilled that I got his best side.

We made some last minute adjustments to the existing flooring to provide better
table placement and to make the table height adjustable . I removed the existing
table base and filled the hole. The inspection cover for the fuel tank sender is 
positioned in the perfect spot so we will use that for our new base and table support.
Odd place for a table leg Isn't it ??  
This provides way better spacing and cleans up the floor area
                      I made a mounting ring out of aluminum and installed that in halves 

Installed a 3/4" marine plywood puck using West System 6-10 , just needs paint.

As the days pass we finish the final prep on the interior and setup a work area for
the upholstery  people. And then out of the blue the UPS man is here and he has
a delivery of  fabric for the headliner and walls. 66 yards to be exact, 2 very large
rolls that look even bigger mounted on the homemade stand.  


This photo shows the homemade rack for dispensing the headliner material
on to the work table , you can see the patterns hanging on the wall waiting to be 
transferred to new material and installed. 


 This is a better shot of the headliner and wall patterns. This only shows about half
of the total number of patterns needed to do the Fuelishness.

Waiting on stuff has been the hardest part of this whole project. West Marine just
doesn't have everything I've needed so it has been a game of "find and ship" with
the added wrinkle of "wait" fused  to the end. Found out that I'm pretty good at
"Finding and Shipping" but I really suck at "Waiting". 
But the real payoff is when those delivery guys come calling, and dropping off
those "Little Boxes of Happiness". It's just like Christmas !! 
Today was a landslide, UPS, and FEDEX were both here and now I have 
A/C parts , a faucet, Vent Grilles, Door hardware, Light Tapes, Fuel Vents,
and Nav Lights. I now have plenty to do and hope it takes me until the next
shipment arrives to finish installing what I got today.  

Suzanne took a call from the upholstery people today and she has not yet shared that 
conversation with me , so I'll save that for next post.  

Next Up :  Setting the Stage
     

Tuesday, April 9, 2013

Welcome to "Yachtsville"

Being able to say that the platform is done and checking it off the list certainly
gives us momentum. If we can keep the pace moving like this we will be right on
target to launch the week before or the week after memorial day.
The single largest job is starting now and we are excited to see headway on the
interior.  Suzanne has been in charge of this part of the project from the very  
beginning, and a while back I was asking her about what she had in mind for
headliner material and so forth.  It's kinda nice to let someone else drive the bus
once in while especially in a situation like this, cause if I were picking things out
lord only knows what we would end up with.
So finally in response to the many interior questions , Suzanne asked me to meet
her at the boat after work and she would explain everything. Now at first I didn't 
think too much about this, until I saw her filling her little canvas presenation bag
with all kinds of interior related samples,  and the bag looked pretty full too .
A little before quitting time I noticed that Suzanne had already gone to the boat
and so I beat feet down there as my curiosity was really on fire at this point.
As I climbed  the ladder to get in the boat Suzanne welcomed me aboard and asked
me to have a seat and not to say anything until she was done. My wife is never
happier than when she is creating ("Designing")something, The presentation
that followed was a little surprising. 
Suzanne started by telling me that our boat was old, but had a timeless
European shape and that by adding the platform and changing a few key
elements she would like to re-design the purpose of  the Fuelishness.
Admittedly I'm curious, although slightly confused.
She continued  by saying her plans included doing the cockpit interior ,changing
 the flooring and adding some high polished stainless steel trim. Suzanne  proposed
that some of the American raceboat look be softened and changed to favor
an Italian performance cruiser.
Suzanne now has my full and undivided attention, and I pretty much sat there
 stunned as she showed me samples of the Ferrari Beige leather for the cockpit ,
Teak Flooring , Stainless Trimmed gauges and a leather wrapped steering wheel.  
It seemed as though her little canvas bag would never go empty and every thing
she pulled out fit so well with the one before it that each passing item made me
 smile a little wider.

She concluded her presenation with samples spread everywhere and a convincing
                                 "Welcome to Yachtsville".
   
I guess you probably figured out that I agreed to everything she proposed
and I'm really wound up on the whole idea.

My first question to her after she finished her presentation was
"How long have you been reading my boat magazines"?
she replied "long enough to know what you like"!. 

With all the questions answered about the direction of the project
it's definitely game on!!

            The cockpit interior has vanished which has raised a few new issues. 


Before


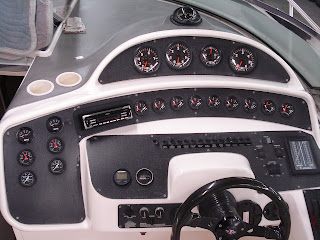
The dash is also undergoing a face lift, the gauges are on their way to Faria Corp.
to get updated and recalibrated, the gauge panels are getting re carbon fibered, 
2 of the panels are being replaced to make way for a dash mounted IPAD to
control the sound system.  


After Teardown

I needed some help with the dash panels and so I called my pirate friend.
John picked up my patterns and got them back to me in just a few days,
and with a perfect fit. now it's just a matter stripping the existing
panels,epoxy priming them  and dropping them off at the Liquid Grafics Shop.


                               Here are the new panels cut , fit and ready for primer.

I had menetioned above that removing the interior had uncovered some issues,
as Scott was removing the cockpit interior he discovered some soft spots in the 
old seat frames, which will require us to replace some of the under structure.
Now check this out, I pulled my boat in the fall of 2011 and it has sat uncovered
in a dry warehouse this whole time and the seat frames are soaking wet. 
No kidding , when Scott and I got the seats out of the boat and peeled back the 
vinyl and foam those frames were soaking wet. 
This what I found when the passenger seat came out,. It was still wet no kidding !
This area has no drain of any kind, I have to figure out a way to fix this, I am
open to any suggestions at this point.  


Next Up:   Little Boxes of Happiness        


Monday, April 8, 2013

A Pirate Sails Away

When John and I started the platform project it was always my responsibility to do the paint work.
I remember John saying " I'll make it strong --- You make it pretty " . So with the final welding done 
it's off to the paint shop to make it pretty.
First thing after removing the platform from the boat  for the last time is to fabricate a stand to get it through the paint shop on. My idea is to use PVC tubing on top of a bed dolly, it definitely holds it steady and at just the right height.
              The photo above shows the platform primed , block sanded and ready to be painted .

This photo shows the platform flipped and etch primed, that is the same material that is used by aircraft companies like Boeing to get superior adhesion on aluminum. This is a wet on wet process and so as soon as this has flashed off  the color will follow.
                                 The bottom is done, tomorrow it's flip and spray the top.

Flipped and Sprayed

                         This is the final color coat, I used  all PPG products bottom to top.  

I have been using PPG in my shop for 20+ years and really like the easy use of  their products.
This is a bit of a waiting game now as the top color coats are ESSS Polyurethane and tend to dry slowly.

During the wait time I got a visit from Mike Turk my graphics artist, Mike and I have been friends for many years and cant say enough about Mike's talent, either with a brush or vinyl he will always surprise you,,  pleasantly of course.
Mike's visit to my shop today put the personality back into the Fuelishness. All the factory stripes and Logo,s were reinstalled. Suzanne happened to stop by the shop after Mike was finished and remarked " The Fuelishness is back" .

                                                        I think she's right

With the wait time now complete I'm very excited to be re-installing the platform, I think that this platform really gives the boat a new look. I feel like John and I really hit the mark as we go for the factory look. 
This area has been nick named "Suzanne's Beach Club" ,John and I have had a lot fun with that one.

As I was finalizing the installation John came by and he brought along  some stainless steel rub rail trim pieces that he was just sure as heck would be the perfect touch to finish the platform edge. 
I know that I have said in past posts that John is a hard worker and talented and ll that, but this is really where the term "magician" could be easily used.  What took place that afternoon was truely magic. John took raw stainless steel trim ,cut it to fit the edges and angles, welded , polished and custom bent the most perfect crowning touch that you could ever imagine. The part that really makes it magic is John did all this at my shop with hand tools.
                                   These shots really sum up the factory look we were after. 
                                             The stainless trim finishes the edge prfectly    

                             This is the center ladder door open, ready to deploy the ladder .
                                             This is the ladder out and ready to use.

To say I'm pleased with the finished  package would be down playing the facts. This is the most fun I have had doing a project in I can't tell you how long. We not only hit our target , John gets the Bullseye for the trim work. I think it was when I was taking the picture above is when I realized that this part was done and over ,that I wouldn't be seeing John anymore. So as my pirate friend sailed away I was sad, but I knew down deep in my heart that there's at least one more project left in the Fuelishness for John and I . 


Next up :   Welcome to "Yachtsville"      
     

Monday, April 1, 2013

Surprise--Surprise--Surprise

After a several really good days of work on the platform John is leaving for an emergency repair job.
That's ok as John is a very hard worker and his pace is pretty hard to keep up with. I welcome the short break. During his absence John has requested that I final grind all the welds and see if I can get some ideas  for the ladder pocket. 
This is a shot of  John grinding some under structure welds, the platform is flipped fore to aft and is resting on its back.    
Here's the platform back on the boat again, all the cosmetic grinding is done and I'm working on the ladder panel . I decided to put the ladder inside the platform dead center. The brown cardboard panel is the template  for the real thing. John's repair job has taken a little longer than figured in the beginning, so I finished the ladder project on my own. I ended up fabbing the ladder door , setting up the hinges and catches, and final fit on the ladder . It's sweet and I saved myself a couple of bucks in the process.

Now that I'm all caught up with the platform my attention has turned to the cabin interior and an upholstery company.  In my last post I stated that we hadn't  selected an upholstery company.
That in fact was not completely true, we had interviewed someone with intention of giving them the job but strangely enough on follow up they stood us up twice and then stopped returning our calls. 
But I have learned that in life everything happens for a reason and this would prove no different.
During a call to a vendor for some material we were looking at for the cabin I had mentioned about the awful service we were getting  from an upholstery shop. The salesman stopped me and said I think you are looking in the wrong area for help , You should talk to people in the aircraft industry.
He went on to say that these people are real professionals and are the "uber technicians"  of the industry.   Now the little wheels in my head are burning rubber, because WesStar Avaition is close to my shop.   I made a call to the nice people at WesStar and was invited to come out and tour the facility. I was met by the upholstery dept. manager Bill Miller who showed me what they do and the level of quality that they work at, I was very impressed by all of it.
But this too would fall apart as Mr. Miller explained that I would have to bring the boat to him.
As I was preparing to leave Mr. Miller and I stepped into his office briefly , he  got into his desk and pulled out a business card for a company called VIP Upholstery in Missouri, He further explained that Cheryl and Scott where people he knew personally and that they could do the work at my place.  A few hours later when I called VIP I was greeted by Cheryl and as luck would have it she had time to see us. To say that the 4 of us have hit it off is probably an under statement.
I feel that we have a partner in this part of the project that we just didn't have before. Turns out that Cheryl and Scott both worked in the aircraft industry before going out on there own and still do work for WesStar from time to time. VIP has a nice reference list of clients that includes a number of aviation companies and MTI Boats. I personally know Randy Siscm the president of MTI and know that his standards are very high and he makes no compromises of it, this says a lot. 

A new energy is felt in the project so we have decided that since we are waiting for John to return that we we will strip the interior. This proves to be the biggest surprise to date. 

Peeling and marking the existing materials was easy, it's whats under the vinyl that's a little unsettling. 
Doing my best to describe this stuff would go like this, Orangey- yellowy- foamy- sticky.

                                This is a ceiling to wall area with just the vinyl removed.
This a shot of the salon ceiling scraped with a blade to remove the foam, whats left behind is the glue from when the original vinyl was installed. This final layer of glue proved to be quite stubborn. 
My first try to remove the stuff was with a wire wheel and drill, I wasn't so much removing it as I was pushing it around. Then I tried some 3-M Adhesive Remover and a shop towel but I couldn't keep a wet edge going. I did hit paydirt when I put the 3-M Adhesive Remover in a spray bottle, misted it on the glue and scraped it with a razor blade scraper. The 3-M stuff turned the glue to snot and It only required a little effort to get the snot to roll off. It was still a huge mess, spray , scrape and catch the snot in box as it dripped off. I had to catch the snot in something as it would melt a hole in the floor wrap if  I let it hit the floor.           
Here's a shot of the slimy snot , dripping off the ceiling, but look how clean it leaves the ceiling.

Here's the same area after cleaning and ready for new vinyl, You could almost use it like it is because the interior parts of an Excalibur are very nicely gel coated as you can see.
There is one point that I have to make before I move on. Remember me saying I put the 3-M  stuff in a spray bottle and misted it on the glue. When I started doing that I was so pumped up that I had found something that would work that I didn't realize that I was breathing that stuff ( in a confined area) and wow wee I was buzzed up like a bad boy real quick, and then the worlds worst headache to follow. Note to self , put the respirator on and keep it on! 


Next up :  A Pirate sails Away 

Help from My Friends

The single main reason we pulled the boat in the first place was because of the much needed interior job. Almost every company we called and spoke to is adamant about not doing a headliner or walls while the boat was in the water. To say we got a lot of mixed advise would really be putting things lightly. But one thing that they all have had in common is they don't want to strip and clean the interior, I get that , it's a suck job but has to be done. We have noticed that of the companies who have bothered to give us a written bid , the amount of money allowed for the strip and prep was huge. I have spent a good portion of my life doing jobs that other people don't want to do, why should this be any different? Well there's a nice savings in me doing it anyway.
Just surveying this part of the project is a little intimidating so I called my good friend  Tommy who is retired from SM Wilson construction, Tommy was a project manager for them and always brings a fresh take on things when I ask him for help. The two of us got together and formulated a plan to strip the headliner and walls, it all starts with covering everything in that clear sticky plastic wrap like the dealers use in new cars.   
                                                   This is a  shot of Tommy getting started wrapping .
 This is kinda the done deal, The couch is coming out and then the carnage will commence .
The idea is take each piece down and mark it and store it away to use for patterns later. I'm not sure by who because we haven't settled on an upholstery company yet.

My pirate friend started work on the platform, he delivered to the shop a 5' x 10" sheet of aluminum which will ultimately be the top. Before I could shoot a picture of the cardboard platform I built,  John dissected it with a razor knife and started laying out the top pattern with a Sharpie. 
That's a boat trailer / work bench, that worked perfectly for  the primary layout and cutting.
I shot this picture as John was just getting started, then my cell phone rang and I was needed back at the main office. A few hours later when I returned this is what I found.

Wow this guy is quick and very focused, by the time I got back, John had the top plate cut , fit ,
 temp fastened to the boat and was welding under structure in place. I remarked to him how fast it was taking shape, he just smiled and said it's easy "I'm using your patterns". When John cut the cardboard template apart for the top he also decided to use the under structure patterns as well, which made the primary fabrication go like lightning. John spent the rest of the day cutting pieces and tacking it all together, by the time the day was over we pretty much knew extactly what the platform would look like. I could not be happier , this project needs more days like this. 


Up Next : Surprise--Surprise--Surprise